> For the complete documentation index, see [llms.txt](https://help.reasy.ai/help/llms.txt). Markdown versions of documentation pages are available by appending `.md` to page URLs; this page is available as [Markdown](https://help.reasy.ai/help/getting-started/engines/screens/building-app-layout.md).
# Building App Layout
Structure Your App With Ease
As you create your app, you will be provided with a default 'Login' layout and a 'Main' layout to give you a head start. If your app includes a login page, you can simply customize and use it, saving you the trouble of designing it from scratch.
Before you start customizing or creating a layout, here are some tips to consider to make your app more appealing and user-friendly:
{% hint style="info" %}
**Tips to enhance User Experience**:
1. Organize your visual components in a way that reflects your brand's tone and identity.
2. Focus on the content and visual structure to help your users quickly discover and understand the information.
3. Keep your app’s visual journey simple. This makes it easier for your users to navigate through it.
4. Ensure that your app effectively communicates its purpose and creates an excellent user experience.
{% endhint %}
### Customizing the default layout
To begin customizing a layout,
* Expand the **Login Layout i**n the Navigation Explorer and navigate to **Assets** > **index.html.**

* Open it on the canvas, and a **Toolbox** will appear on the right. This contains layout elements that will help you in building your app's layout quickly and efficiently.
* Next, head to its **Properties**, placed right on the workspace.
* Expand the **Design** tab to access customization options for all your visual elements, navigation elements, fonts, typography, and many more. Tailor them to match your product's design and align with your brand.

Save your changes after you customize. Moreover, you can see how it appears on other devices, such as tabs and mobiles, by clicking these canvas actions.
### Creating a new layout
1. Clickin the Navigation Explorer, and select a layout that best suits your app.\
2. Customize all the visual elements, navigation elements, fonts, typography, and color. As you make changes to your layout, a live preview will show those changes. You may also check how they look on tablets and mobile devices.\
The settings you configure here will apply to all screens in your app.\
3. After customizing, the app takes you to the workspace. Open the created layout and add the necessary elements to it.
4. Then, save your layout.
{% hint style="info" %}
**Hint**: As you have the flexibility of customizing the layout later, you can simply pick a layout and start building screens. However, it's a good idea to make your layout first so you can preview your screens along with it as you build them.
{% endhint %}
### Importing a layout
If you already have a layout created outside of Reasy that meets your requirements, you can import it here.
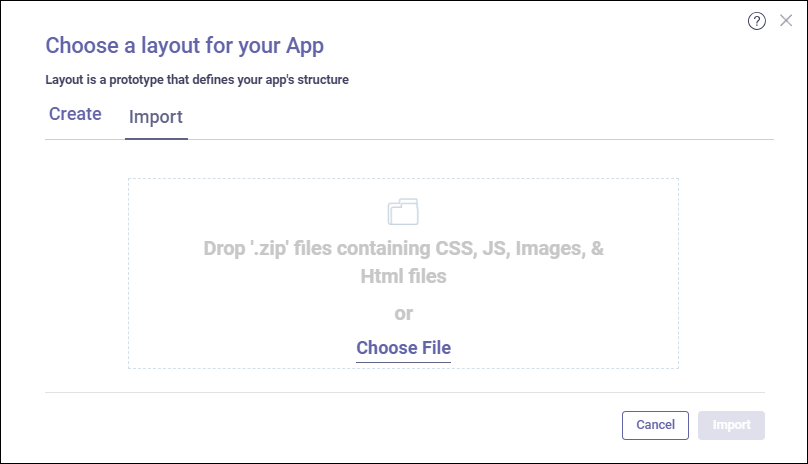
To import, switch to the **Import** tab in the Layout selection wizard and select the zip file containing CSS, pictures, JS, and HTML files.
Access your imported layout from the Navigation Explorer. Expand the layout you imported and open "index.html" under Assets.
Use it as is or you can make the necessary changes to fit your app and save your changes.
### Element Tagging
Tags help Reasy understand the elements of your layout. You do not need to tag the elements when using Reasy layout patterns as they are self-tagged. In the case of imported layouts, it is necessary to tag their elements, for the platform to understand them. For instance, if the imported layout has a header, footer, menu, language picker, logout, and other elements, you must tag all of them.
To tag an element, switch to the **Tagging Elements** tab in the Toolbox, drag the necessary tags to the elements in the layout, and save it.
## Explore Through Video Learning
{% embed url="" %}

 in the Navigation Explorer, and select a layout that best suits your app.\
  2. Customize all the visual elements, navigation elements, fonts, typography, and color. As you make changes to your layout, a live preview will show those changes. You may also check how they look on tablets and mobile devices.\
The settings you configure here will apply to all screens in your app.\
2. Customize all the visual elements, navigation elements, fonts, typography, and color. As you make changes to your layout, a live preview will show those changes. You may also check how they look on tablets and mobile devices.\
The settings you configure here will apply to all screens in your app.\ 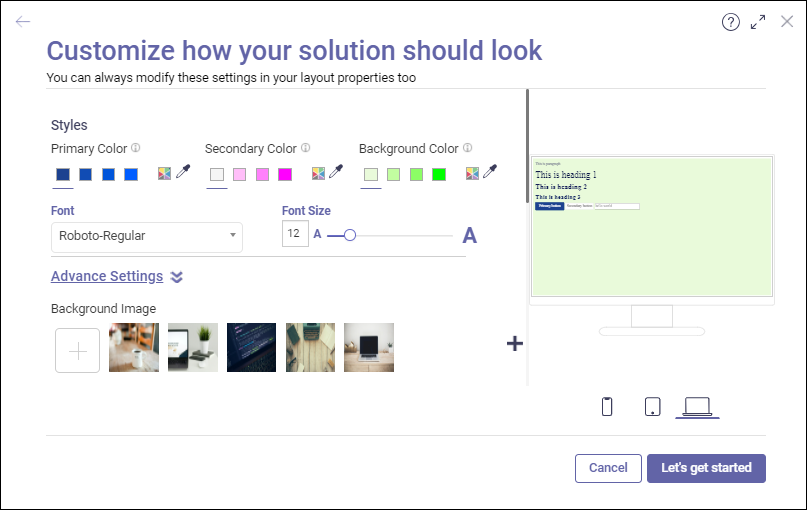 3. After customizing, the app takes you to the workspace. Open the created layout and add the necessary elements to it.
4. Then, save your layout.
{% hint style="info" %}
**Hint**: As you have the flexibility of customizing the layout later, you can simply pick a layout and start building screens. However, it's a good idea to make your layout first so you can preview your screens along with it as you build them.
{% endhint %}
### Importing a layout
If you already have a layout created outside of Reasy that meets your requirements, you can import it here.
To import, switch to the **Import** tab in the Layout selection wizard and select the zip file containing CSS, pictures, JS, and HTML files.
3. After customizing, the app takes you to the workspace. Open the created layout and add the necessary elements to it.
4. Then, save your layout.
{% hint style="info" %}
**Hint**: As you have the flexibility of customizing the layout later, you can simply pick a layout and start building screens. However, it's a good idea to make your layout first so you can preview your screens along with it as you build them.
{% endhint %}
### Importing a layout
If you already have a layout created outside of Reasy that meets your requirements, you can import it here.
To import, switch to the **Import** tab in the Layout selection wizard and select the zip file containing CSS, pictures, JS, and HTML files.
 Access your imported layout from the Navigation Explorer. Expand the layout you imported and open "index.html" under Assets.
Use it as is or you can make the necessary changes to fit your app and save your changes.
### Element Tagging
Tags help Reasy understand the elements of your layout. You do not need to tag the elements when using Reasy layout patterns as they are self-tagged. In the case of imported layouts, it is necessary to tag their elements, for the platform to understand them. For instance, if the imported layout has a header, footer, menu, language picker, logout, and other elements, you must tag all of them.
To tag an element, switch to the **Tagging Elements** tab in the Toolbox, drag the necessary tags to the elements in the layout, and save it.
## Explore Through Video Learning
{% embed url="
Access your imported layout from the Navigation Explorer. Expand the layout you imported and open "index.html" under Assets.
Use it as is or you can make the necessary changes to fit your app and save your changes.
### Element Tagging
Tags help Reasy understand the elements of your layout. You do not need to tag the elements when using Reasy layout patterns as they are self-tagged. In the case of imported layouts, it is necessary to tag their elements, for the platform to understand them. For instance, if the imported layout has a header, footer, menu, language picker, logout, and other elements, you must tag all of them.
To tag an element, switch to the **Tagging Elements** tab in the Toolbox, drag the necessary tags to the elements in the layout, and save it.
## Explore Through Video Learning
{% embed url="